Table Saw Kickback Explained: Why It Happens & How to Reduce the Risk
NOTE
Evidence Level: Level 0 — Theory Lab
This article uses physics, equipment design, and published safety guidance. It does not include physical kickback testing.
DANGER
Safety Note: This article explains kickback mechanics, not operating instructions. Always follow your saw manual, use the manufacturer-approved guard, riving knife or splitter, anti-kickback device, push sticks, and avoid operations your saw is not designed to perform.
For a broader map of related safety concepts, see our table saw safety topic hub.
What Is Table Saw Kickback?
Many serious table saw incidents begin with loss of control at the cut. Kickback is one of the most violent versions of that failure because the blade can turn the workpiece into a fast-moving projectile.
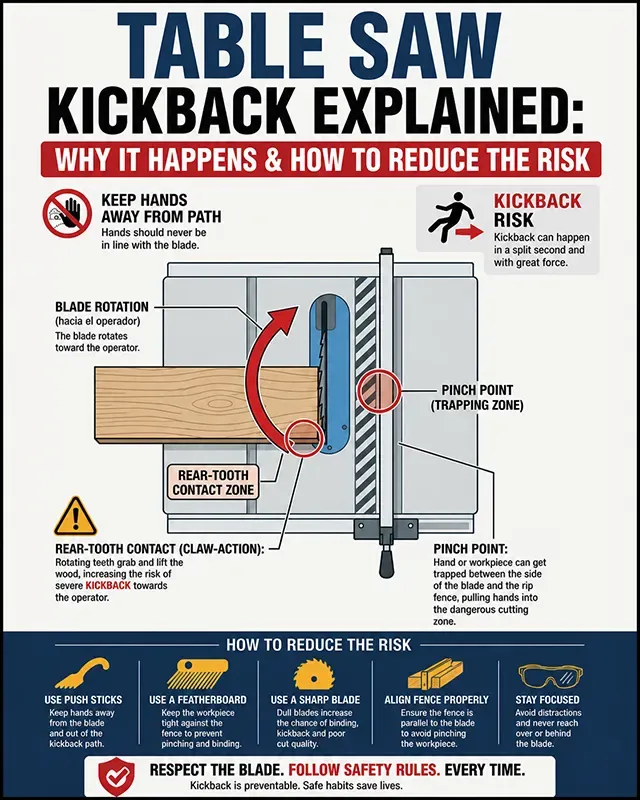
Instead of cutting through the wood cleanly, the spinning blade grabs the board, lifts it from the table, and throws it back toward the operator. Sometimes, that sudden loss of control can also pull the operator’s hands toward the blade or trigger a dangerous reflex movement. To manage this risk, we need to look past basic safety warnings and understand the exact mechanical sequence that causes a board to launch.
Why the Rear Teeth Are Dangerous
A standard 10-inch table saw blade spins at roughly 3,000 to 4,000 RPM. At the front of the saw, the teeth are traveling downward, pulling the wood into the cast-iron table. At the rear of the blade, the teeth are moving rapidly upward.
For kickback specifically, the most dangerous contact usually happens at the back half of the blade. The tooth rim speed on a 10-inch saw can exceed 100 mph, so once the rear teeth gain purchase, the event is faster than human reaction time. The actual speed of the workpiece depends on contact, mass, blade speed, and how long the teeth stay engaged. If the wood makes solid contact with these rising teeth, the rotational force of the motor transfers directly into the board.
The Main Kickback Failure Modes
Kickback is rarely random. In most cases, it follows a predictable mechanical pattern where the workpiece interacts incorrectly with the rear teeth.
Failure Mode 1: Kerf Pinch During a Rip Cut
One of the most common kickback mechanisms occurs during a rip cut. For a safe pass, the board must slide cleanly between the blade and the rip fence. If the rear of the board drifts inward toward the blade, or if the cutoff piece gets trapped, it creates a pinch point. The back teeth grab the trapped wood, and the kickback sequence initiates.
Failure Mode 2: Fence Toe-In and Workpiece Rotation
This is why fence alignment is a critical setup parameter. A fence that “toes in”—meaning it tapers closer to the back of the blade than the front—is a mechanical trap.
Some experienced operators discuss setting a very slight rear clearance, but the safe baseline is to follow the manufacturer’s alignment procedure and avoid any fence condition that narrows toward the rear of the blade. If the distance between the blade and the fence is tighter at the back than at the front, the workpiece will wedge against the upward-moving teeth.
If you are comparing front and rear fence readings, the fence alignment calculator can help translate the difference into toe-in or toe-out direction.
Failure Mode 3: Internal Wood Tension
Sometimes the machine is set up perfectly, but the wood itself is the problem. Lumber with internal wood tension (reaction wood) can warp the exact moment it is cut. If the two halves of the board bow inward and pinch on the back of the blade as they pass the arbor, the resulting friction will bind the blade and frequently result in the board climbing the teeth.
Failure Mode 4: Trapped Offcuts During Crosscuts
One of the most dangerous mechanical errors involves crosscutting. Using a miter gauge to push a board across the blade while the end of the board is simultaneously riding against the rip fence creates a high-risk bind condition. As the cut finishes, the severed piece gets trapped between the rising teeth and the fence with nowhere to go.
If you need to register off the fence for repeatable crosscuts, the standard mechanical solution is to clamp a solid clearance block to the fence, well in front of the blade. The workpiece registers against this block, but loses contact with it before the blade actually starts cutting, ensuring the cutoff piece has room to harmlessly drift away.
How a Riving Knife Reduces Kickback Risk
Because human reaction time is too slow to stop a kickback once the wood lifts, avoiding it relies heavily on setup and passive safety devices.
For kickback during ripping, the riving knife is one of the most important passive safety devices because it stays close behind the blade and keeps the kerf from closing. It is a curved piece of steel mounted to the blade carriage or arbor-support assembly, meaning it rises, falls, and tilts with the blade.
By filling the kerf (the slot cut by the blade), the riving knife physically prevents the two halves of a tensioned board from pinching the rear teeth. It also acts as a mechanical barrier that stops the board from drifting away from the fence and rotating into the back of the blade. To function correctly, the riving knife must be properly aligned and carefully sized: it must be thinner than the blade’s kerf width, but thicker than the main steel blade plate. This is why changing to a thin-kerf blade can require checking riving knife compatibility instead of assuming the original setup still works.
A riving knife helps reduce the chance of the workpiece contacting the rear teeth, but the operator still needs a controlled way to feed the stock through the cut. For hand-position and feed-pressure decisions, see our guide to push stick and push block control.
Riving Knife vs Splitter vs Anti-Kickback Pawls
Older saws often use a splitter instead of a riving knife. While similar in its basic function of keeping the kerf open, a splitter is usually fixed to the rear trunnion assembly or the throat plate and does not move up and down with the blade. While a splitter provides critical protection for through-cuts, operators frequently must remove them for non-through cuts (like when using dado blades) and forget to reinstall them.
Anti-kickback pawls are not the same as a riving knife. The riving knife prevents the kerf from closing and limits rotation into the rear teeth. Pawls are one-way gripping fingers designed to resist backward motion if the workpiece starts to come back. They are a secondary defense, not a substitute for correct setup, fence alignment, and a riving knife.
Blade guards serve a different role. They help reduce accidental blade contact and may help deflect chips, but they do not replace the kerf-control function of a riving knife or splitter. Kickback prevention depends mainly on controlling the workpiece, keeping the kerf open, and preventing rotation into the rear teeth.
Feed Rate, Push Sticks, and Workpiece Control
Keeping the workpiece flat against the table and tight against the fence throughout the entire cut is mandatory. If the board lifts or rotates slightly, it alters the geometry of the cut and exposes the wood to the upward force of the rear teeth.
Maintaining a consistent feed rate helps the blade clear chips efficiently and reduces heat and friction. Pausing mid-cut or feeding too aggressively can cause the blade to bog down and bind. When the distance between the blade and the fence is narrow, a properly designed push stick or push block is necessary to apply downward and inward pressure simultaneously, keeping hands safely away from the cut path. For crosscutting wider panels safely, moving away from the miter gauge entirely and using a crosscut sled is the standard approach to maintaining control.
Where Blade Guards and Push Sticks Fit
Blade guards and push sticks reduce different parts of the risk. A blade guard helps limit accidental contact with the exposed blade and may deflect chips, while a push stick or push block keeps hands away from the cut path and helps maintain downward and inward pressure during narrow rip cuts.
Neither device replaces the kerf-control role of a riving knife or splitter. In practice, table saw safety works as a layered system: guard, riving knife or splitter, anti-kickback device, push stick, fence alignment, stable feed pressure, and the manufacturer’s operating instructions all address different failure points. This is why published safety guidance often discusses guards, push sticks, and kickback together instead of treating them as separate issues.
INFO
What This Article Does Not Claim
This article does not test a specific saw, blade, fence, or riving knife. It explains the mechanical conditions that increase or reduce kickback risk based on known physics and equipment design. It is not a replacement for practical safety instruction or manufacturer operating guidelines.
Final Mechanical Takeaway
Understanding the mechanical reality of the tool removes the mystery from workshop accidents. A spinning blade and motor system hold a large amount of kinetic energy. By verifying your fence alignment, keeping the kerf open with a properly sized and aligned riving knife, and controlling the board throughout the entire pass, you reduce the chance that energy transfers into the workpiece in an uncontrolled way.
References
- OSHA 29 CFR 1910.213 — Woodworking machinery requirements.
- Consumer Product Safety Commission (CPSC) table saw safety rulemaking materials.
- Federal Register — Safety standard discussion addressing table saw blade-contact injuries.