
Table Saw Blade Guards: Safety, Dust Collection & Non-Through Cuts
INFO
Evidence Level: Level 1 — Document Lab + Mechanical Analysis
Sources: Manufacturer safety documentation, including Bosch and SawStop manuals, and OSHA requirements.
The table saw blade guard is frequently one of the most debated components in a woodworking shop. While manufacturer manuals and regulatory standards treat it as an important means of protecting operators from blade contact, some operators remove the guard because they find it interferes with certain setups, reduces visibility, or adds setup friction. Understanding what the guard actually does—and examining how it interacts with riving knives, dust collection, and non-through cuts—helps clarify when it must stay in place and when alternative configurations are required by machine design.
What the Blade Guard Actually Does
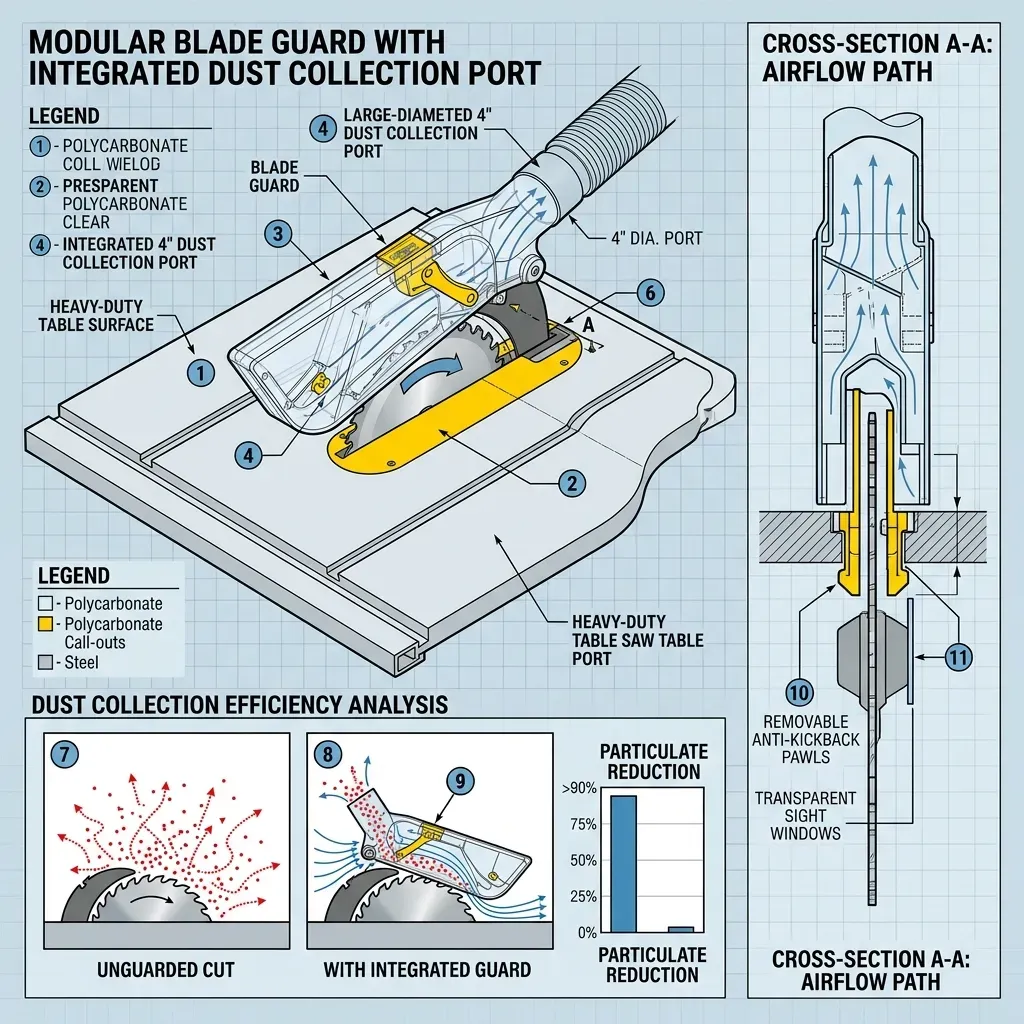
Mechanically, a table saw blade guard primarily provides a physical barrier between the operator and the exposed portion of the blade. As reflected in OSHA’s woodworking machinery requirements, the guard acts as an enclosure over the point-of-operation hazard to reduce the opportunity for accidental contact with the spinning teeth during normal feeding.
On saws equipped with an overhead dust-collection port, the guard can also serve as a localized dust-capture shroud. Because a spinning table saw blade generates a turbulent cloud of fine particulate matter, an overhead port draws air directly from the point of generation. This setup can complement table saw dust collection from the saw cabinet or lower enclosure, although actual dust capture depends heavily on the saw model, guard design, airflow velocity, and workpiece geometry.
Guard vs. Riving Knife: Understanding the Difference
A common point of confusion is conflating the blade guard with other anti-kickback hardware. Mechanically, these components fulfill distinct roles:
- Blade Guard: Provides an upper physical barrier against contact and, where equipped, captures localized dust.
- Riving Knife or Splitter: A rigid plate positioned behind the blade to help maintain separation in the kerf and reduce the chance of the workpiece closing onto the rear of the blade. Riving knives and traditional splitters perform a similar safety function but differ in geometry and relationship to blade height. Maintaining separation in the kerf behind the blade reduces the chance that the workpiece will close onto the rear of the blade—a condition that can contribute to kickback. For a deeper look at mechanical triggers, review table saw kickback mechanics, and consult riving knife vs splitter comparisons for structural variations.
- Anti-Kickback Pawls: Spring-loaded fingers designed to engage the workpiece if it moves backward toward the operator, helping limit the movement of stock during a kickback event.
On some saws, including designs from Bosch and SawStop, the riving knife or splitter can remain installed when the overhead guard must be removed for specific operations.
The Challenge of Non-Through Cuts
Non-through cuts—such as dados, rabbets, or grooves—can require a different guarding configuration because the blade does not extend through the full thickness of the workpiece.
When performing non-through cuts:
- The operator must consult the saw manufacturer’s specified non-through-cut configuration.
- Depending on the machine manual, the overhead guard may need to be swung clear or detached.
- The riving knife setup must match the manufacturer’s specified configuration. On some saws, the riving knife is designed to remain below the top of the blade for non-through cuts. Other machines may require a different manufacturer-approved riving-knife or guard configuration. The correct setup is model-specific. When preparing specialized joinery, always verify clearances according to guidelines covering which table saws accept dado blades.
- When the overhead guard cannot be used, the operator should follow the saw manufacturer’s specified non-through-cut configuration and use appropriate push devices, workholding, and safety practices for that operation.
Mounting Systems and Real-World Friction
The utility of a blade guard depends heavily on its mounting hardware and alignment. Some older contractor-saw designs relied on rigid rear-mounted guard assemblies that could make alignment and removal more cumbersome, whereas many newer saw designs use modular or quick-release guard assemblies, with some systems mounting the guard directly to the riving-knife assembly.
Despite these engineering improvements, several practical friction points can still affect guard usability:
- Visibility: Clear plastic shields can accumulate pitch or fine scratches over time, obscuring the cut line.
- Narrow Rip Clearance: Some guard designs can interfere with the rip fence or workpiece during narrow cuts. On compatible saws, the manufacturer’s riving-knife configuration may allow the cut to be made safely without the overhead guard.
- Mechanical Binding: A misaligned or poorly secured guard can interfere with the workpiece during feeding. The guard should be checked for secure mounting and adequate clearance before operation, and it should not contact the blade, workpiece, or other machine components.
Before operating the saw, verify that the blade alignment, table saw fence alignment, and guard are correctly aligned and that the workpiece has adequate clearance throughout the cut.
Maintaining the Correct Safety Configuration
The goal of shop safety is not to choose between convenience and protection, but to use the guarding configuration specified for the operation. For standard through-cuts, manufacturer instructions from brands like Bosch and SawStop specify keeping the blade guard, riving knife, and anti-kickback devices installed as designed. When a specialized non-through operation requires a different setup, the operator should follow the manufacturer’s specified riving-knife or guard configuration rather than simply discarding safety components.