
Table Saw Blade Alignment: Miter Slot, Fence, and Trunnion Checks
NOTE
Evidence Level: Level 2 — Protocol Lab
This article uses physics, equipment design, and published safety guidance. It does not include physical kickback testing.
DANGER
Safety Note: This article explains a measurement protocol, not a universal repair procedure. Always unplug the saw before inspection, follow the manual for your model, and do not loosen trunnion, motor, or table bolts unless the manufacturer provides an adjustment procedure.
Why Blade Alignment Matters
A poorly aligned table saw is frustrating, but more importantly, it can increase risk. When the blade is noticeably out of parallel with the path of the wood, the rear teeth can rub, burn, or push against the workpiece as it passes through the cut. In a rip cut, that extra contact can increase binding and kickback risk.
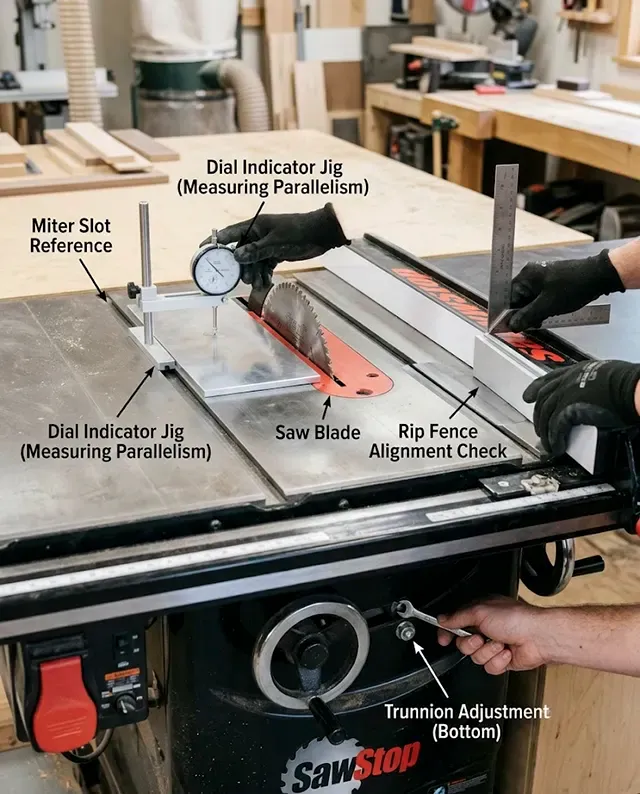
Getting a saw dialed in requires establishing a baseline and checking components in a strict mechanical order: align the blade to the miter slot, align the fence to the miter slot, and verify the riving knife or splitter.
The Miter Slot Is the Reference Baseline
The miter slots are milled directly into the cast iron or aluminum table. Because they do not move, they serve as the permanent reference point for the entire machine. Every calibration on a table saw is based on the assumption that the wood will travel parallel to these slots.
Use the same miter slot for every reading, preferably the slot you most often use for sleds, gauges, or alignment jigs. Do not switch between left and right miter slots during the same measurement sequence.
Runout vs. Alignment
Before adjusting anything, it is critical to separate alignment issues from runout issues. Alignment describes whether the flat plane of the blade is parallel to the miter slot. Runout describes physical wobble in the blade or the arbor. If the arbor flange is warped, the bearings are worn, or the blade itself is bent, the blade will flutter side-to-side as it spins.
The Same-Tooth Rule
If you measure the distance from the miter slot to a front tooth, and then measure the distance to a different rear tooth, your reading will include both alignment errors and blade runout. This leads to chasing ghost measurements.
Using the same tooth for both the front and rear measurements reduces the effect of tooth-to-tooth variation and blade plate variation on the reading. It does not diagnose arbor runout by itself; it simply makes the front-to-rear alignment check more repeatable.
Tools Needed: Dial Indicator, Miter Bar, Marker, Feeler Gauge
While a high-quality combination square or feeler gauge can get you close, a dial indicator mounted to a miter bar is the standard tool for this job. It provides quantitative, repeatable measurements that remove the guesswork from the process. You will also need a permanent marker to mark your reference tooth.
Blade-to-Miter-Slot Measurement Protocol
- Unplug the saw and raise the blade to its maximum height.
- Mark a single tooth with a permanent marker.
- Position that tooth at the front of the throat plate.
- Set the dial indicator against the marked tooth and zero the dial. Use the same side of the same carbide tooth for both readings, and keep the indicator tip contacting the tooth consistently. Do not compare the left side of one tooth with the right side of another tooth.
- Carefully slide the indicator jig to the rear of the table.
- Rotate the blade by hand so that the exact same marked tooth is now at the rear of the throat plate.
- Let the indicator tip rest against it and take your second measurement.
How to Interpret the Reading
A practical target for careful setup is often around 0.002–0.005 inch of front-to-rear difference, but the correct tolerance is the one specified by the saw manufacturer. Some manuals allow more than a fine-furniture setup target, especially on portable or jobsite saws.
Before Adjusting, Confirm the Error
Do not immediately reach for your wrenches based on one reading. Before committing to a trunnion adjustment, verify the error:
- Take Multiple Readings: Measure at least 2–3 times to ensure your numbers are consistent.
- Clean the Blade: Pitch, resin, or sawdust on the tooth can completely throw off a dial indicator.
- Check the Seating: Ensure the blade is properly seated flat against the arbor flange and correctly tightened.
- Use a Flat Blade: If possible, use a high-quality, known-flat blade or a machined alignment plate for the test.
- Check at 90° and 45°: Measure with the blade at a perfect 90 degrees first. Then, tilt it to 45 degrees and measure again.
- Rule Out Slop: If the measurements fluctuate wildly, the issue might be play in your miter bar jig, a warped blade plate, or how the dial indicator tip is making contact.
Cabinet Saw vs Contractor/Jobsite Trunnion Adjustment
If your blade is out of alignment, you cannot simply twist the arbor. You have to move the assembly that holds the motor and the arbor.
On heavy cabinet saws, the trunnion is mounted securely to the steel cabinet base. To align the blade to the miter slot, you move the table. You loosen the heavy corner bolts holding the cast iron table top to the cabinet, gently tap the top until the miter slot aligns with the blade, and lock it back down.
On contractor and jobsite saws, the table top is fixed, and the trunnion/motor assembly is mounted underneath. Many saws use bolts securing the trunnion or motor/arbor assembly to the underside of the table, but the number, location, and adjustment method vary entirely by model.
Why Ryobi and Other Jobsite Saws Need Model-Specific Research
On some portable saws, including models people commonly search for under terms like “Ryobi table saw trunnion adjust,” the adjustment may involve underside bolts, eccentric screws, or specific motor/arbor mounting points rather than a simple cabinet-saw table shift. Because loosening the wrong bolts on a portable saw can affect the height/tilt mechanism, introduce binding, or make the saw harder to return to factory geometry, this is where consulting your exact manual matters heavily.
Aligning the Fence After the Blade
Once the blade is parallel to the miter slot, you move to the fence. Slide the fence over so its edge aligns with the edge of the miter slot and lock it down.
Some woodworkers set their fence to be dead parallel to the slot. Others prefer to calibrate a microscopic amount of “tail-out”—adjusting the rear of the fence to angle away from the blade by roughly 0.002 to 0.003 inches. This slight relief ensures that the back of the blade cannot pinch the wood against the fence. You should never set a fence so that it pinches inward toward the rear of the blade.
Riving Knife/Splitter Alignment Check
Do not skip the riving knife check. Once the blade and fence are verified, check that your riving knife or splitter is perfectly in line with the blade plate.
The riving knife should not be offset into the kerf path or positioned so it pushes the workpiece toward the fence. Never use “fence tail-out” as a replacement for a properly aligned riving knife. If the riving knife alignment is off, consult your manual for the proper shimming or adjustment procedure.
CAUTION
When to Stop and Call the Manual/Manufacturer
If your saw requires you to loosen bolts that seem to control the tilt gears, or if you tap the trunnion and it violently springs back to its original misaligned position when tightened down, stop. Some entry-level saws lack built-in trunnion adjustments entirely and require specialized warranty service if the factory alignment shifts.
Final Mechanical Baseline
Proper alignment gives the saw a more reliable mechanical baseline. In practice, it can reduce unnecessary rear-tooth contact, make fence setup more predictable, and help the operator identify whether a cutting problem comes from alignment, blade condition, fence setup, or material behavior. Taking the time to execute these checks gives you a clearer baseline before blaming the blade, fence, motor, or material.